1.5 Version Control & GitHub
Contents
1.5 Version Control & GitHub#
Version Control#
Version Control is a system that organize and tracks the version of codes.

Fig. 1 Versions of a research paper. File nameing and tracked changes can become messy. From PhD Comics.#
It keeps track of the changes and who made the changes. See further discussion on The Turing Way [Community, 2022]. Here are the main points.
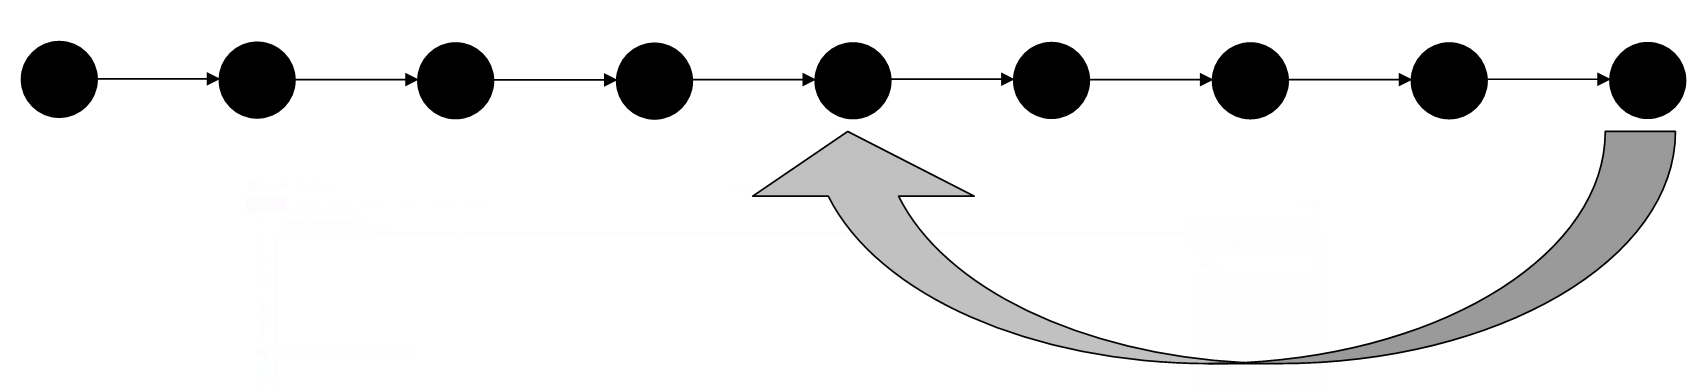
Fig. 2 An illustration of a main branch from The Turing Way 1.#
At each commit, Git will track the changes. Several people can work on the same file, and version control will recognize conflict and provides option to resolve it. It is good practice to make the main branch the cleanest branches. Create additional branches to work on specific parts of the project.

Fig. 3 An illustration of multiple sub branches that get created, committed, and merged to the main branch. From The Turing Way 1.#
What is the difference between git and GitHub?
git is a software: You can use it to track changes only on your computer GitHub is a platform that can host your repository. There are other platforms like Bitbucket, GitLab.
Set up Git#
You need to set up your user name and your e-mail
    > git config --global user.name "superseismo"
    > git config --global user.email "superseismo@uw.edu"
Use the same user name as your GitHub account. On GitHub, you will see who has made the modifications to the repository.
You need to do it only once on your computer.
Main Steps for a Contribution#
To contribute to a GitHub repository, follow these main steps:
Edit Files:
Make the necessary changes to the files in your local repository using your preferred text editor or IDE.
Stage Changes:
Add the modified files to the staging area using the
git addcommand:git add <file1> <file2> ...
To add all modified files, you can use:
git add .
Commit Changes:
Commit the staged changes with a descriptive commit message using the
git commitcommand:git commit -m "Your descriptive commit message"
Push Changes:
Push the committed changes to the remote repository on GitHub using the
git pushcommand:git push origin <branch_name>
Replace
<branch_name>with the name of the branch you are working on, typicallymainormaster.
Example Workflow#
Here is an example workflow for contributing to a GitHub repository:
Edit Files:
Open the file
example.txtand make your changes.
Stage Changes:
git add example.txt
GitHub#
Create a GitHub account#
Create a GitHub account using the same user name and email address as in your git config. Free accounts make you have all of your repository open to the public. Pro (for a fee) accounts allow you to keep repositories private.
Use the GitHub desktop App#
GitHub has a Command Line Interface to use with the Terminal. Check out the Github CLI Cheat Sheet.
GitHub has a GUI desktop app for all OS, including MacOSX and Windows. The desktop app handles the CLI in a user friendly API (Application Programming Interface). The workflow and visualization are really friendly and it is recommended to use from the laptop environment. In JupyterHubs from remote servers, it is still necessary to use CLI.
Notes on GitHub enhanced authentication#
GitHub offers 3 ways to enhance authentication. Download the Android/iOS GitHub Mobile app. Just like Duo, GitHub will use the phone for additional layers of authentication.
Username + Password with two-factor authentication (2FA), which requires the GitHub Mobile App.
Personal Access Token: Click on the upper right account -> Settings -> Developer settings (left sidebar) -> Personal access tokens (left sidebar). Then
generate new token, add a descriptive name, give it an expiration (or not), grant specific permission to the token,Generate token, copy using the clipboard icon, save into a local text file. Keep the file somewhere on local, inaccessible from other cloud storage (e.g., Dropbox or Gdrive). The token replaces the password.SSH keys. Create new SSH keys. See an example on how to set up the key here.
More details here on GitHub authentication.
Use an existing Repository#
You can create 2 copies of a repository:
A Fork (top right click) creates a totally independent copy of the repository. You can modify code as needed and this will not change the original repository
A Clone (also top bar) creates a copy of the original repository, but is linked to the original repository that will continue to be synchronized. Do so with the following commands: git clone “https://github.com/superseismo/example.git”
Create a new Repository#
You are going to create your first repository. Congrats! Go on the browser, In the upper-right corner of any page, use the drop-down menu, and select New repository. It will ask you a series of default settings.
We briefly go over some best practices inspired by Nenadic et al. [2022].
Good repository content are:
README.md: Center piece of the docmumentation. Markdown/text file that describes the purpose of the repository and contain some explanation of what this repository is about. It also contains any information that the contributor sees as important: installation guide, licensing, contribution gudelines, code of conduct, citation, badges and links to Colab or Binder notebooks, … See Software Carpentries Intermediate REsearch Software Development in Python for more details. Find a list of repositories with great readme here. Some of the line items to add:
Installation/Deployment
Basic Usage: step-by-step instructions to use the software
Contributing: detail the type of contributions welcome
Contact information / getting help: guidelines on how to get in touch
Credits/Acknowledgement: Specific the academic publication to cite (e.g., add a bibtex text in a code box like this):
 @software{MLGeo,
 authors = {The GeoSMART team},
 year = 2022,
 doi = {Not yet}
 }
License: a short description, or automatically generated license. See below.
License: Critical: without a license no one can reuse and modify the software. Find a detailed description of the various software vs data license in the Turing Way. Choosealicense is a nice guide to help you find the appropriate license.
Fix the virtual environment for users to be able to re-use the software. Add an environment file environment.yml or requirements.txt
To add files to your repository:
 git add mycode.py
 git commit -m "upload a slick python code"
 git status
 git push
(*) Everytime you start working on your repository, make sure you have the up-to-date version on your local environment. In CLI, this means:
git pull
To modify mycode.py, use the command:
git checkout mycode.py
Note
for the MLGeo2022 course, you will have 2 repositories:
- create your own repository under the UW-ESS-DS GitHub organization under the name: MLGEO2023_UWNETID.
- the course repository, please clone:
git clone “https://github.com/UW-ESS-DS/MLGeo-2023”
Then copy the environment.yml file from the MLGeo2023 course into your own repository.
From the browser:
Connect to your GitHub account
On the top right of your homepage, click
"+"andNew repositoryand choose a name.Check “Add a README.md”
Choose a license
Create repository
Clone the repository to your local.
From the GitHub Desktop app:
Click
Addon the top of the left sidebarClick
Create new repositoryand choose: Name, short description, local path (avoid a home directory on other cloud (Dropbox or Github) to reduce headaches), initialize with a README, choose license, choose Git Ignore (most likely programming language)Open in Visual Studio Code or other preferred editor.
Check that the GitHub page is up to date
Fetch, Push, Pull, etc
From the CLI:
Initialize a local directory as a git repository:
  git init
  git add *
  git commit -m "my first commit"
  git push
Be aware of the need to use passwords or tokens. Your configuration may also be incomplete, so re run configuration listed above.
You can now start writing codes and documentation. GitHub uses staging as terminology to keep track of the new changes that could be committed to the remove server. To add the new script:
  git add newfile.py
  git commit -m "add new script"
  git push
If you made some code modification but prefer using the version that is on the GitHub, you can unstage and reset the file from the last version:
  git reset HEAD newfile.py
  git checkout newfile.py
To do the same for the entire repos:
  git reset HEAD~
  git checkout
  git status
Work as a team#
The main branch should remain the clean, official version for the public.
Use Pull requests to allow others to suggest code changes to a repos. The pull request tracks line-by-line changes and allow the repository contributors. Here is the workflow: - Create a fork of the repository - Clone the fork to the local computer - When done, add+commit+push from local to remote repository. The fork has the new changes. - Pull request from the browser original repository. Make sure that you mention specific colleagues to analyze your submission (use @their-github-name) to notify them. - look at the
diffbetween the two repository. - the repository contributors/owners will accept or suggest additional modification before accepting. - Once accepted, your changes will be part of the main repository.
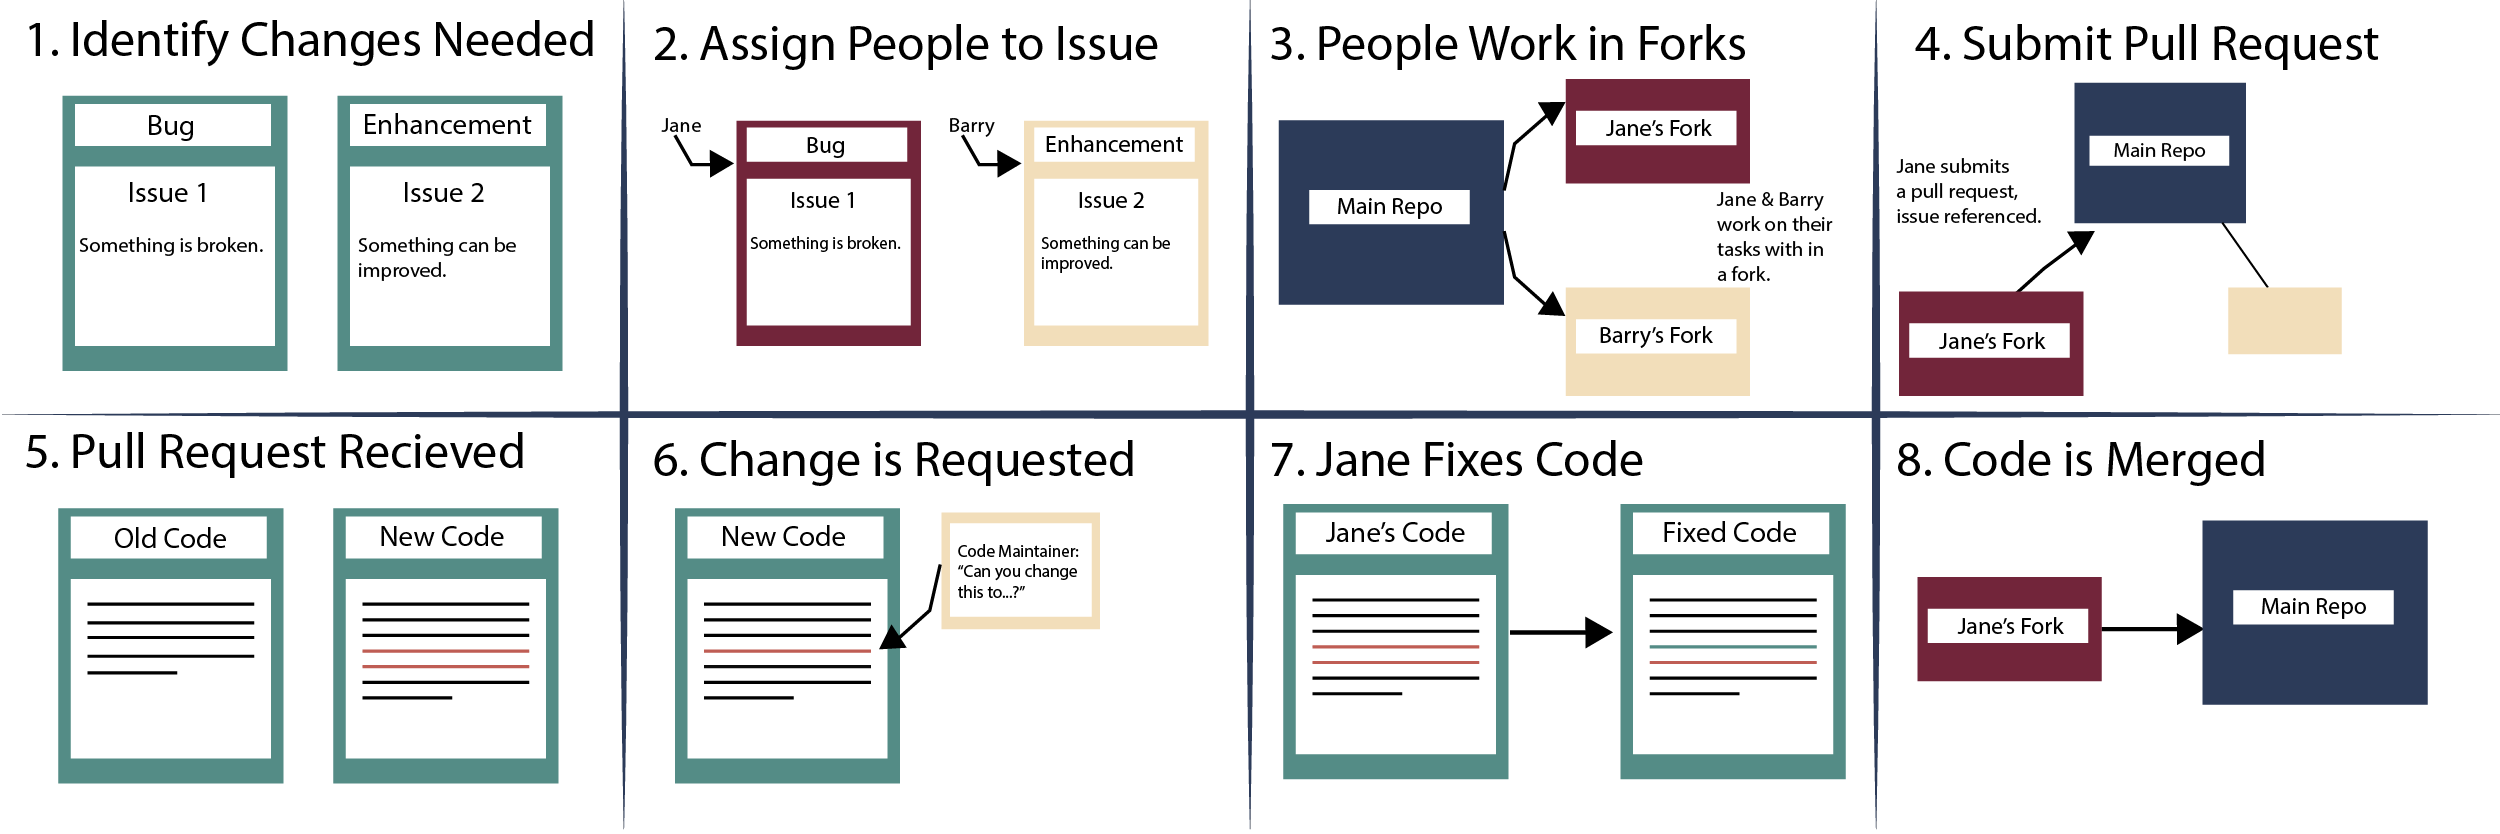
Fig. 4 Pull requests using GitHub: Found in EarthDataScience. Source: Earth Lab, Alana Faller#
Use GitHub Issues to post bugs or performance issues, so that the contributors can keep track and address them. There are templates to posting issues, and online discussions about it. The main takeways are: - Avoid duplication, check if somebody else has had the same issue - Use template
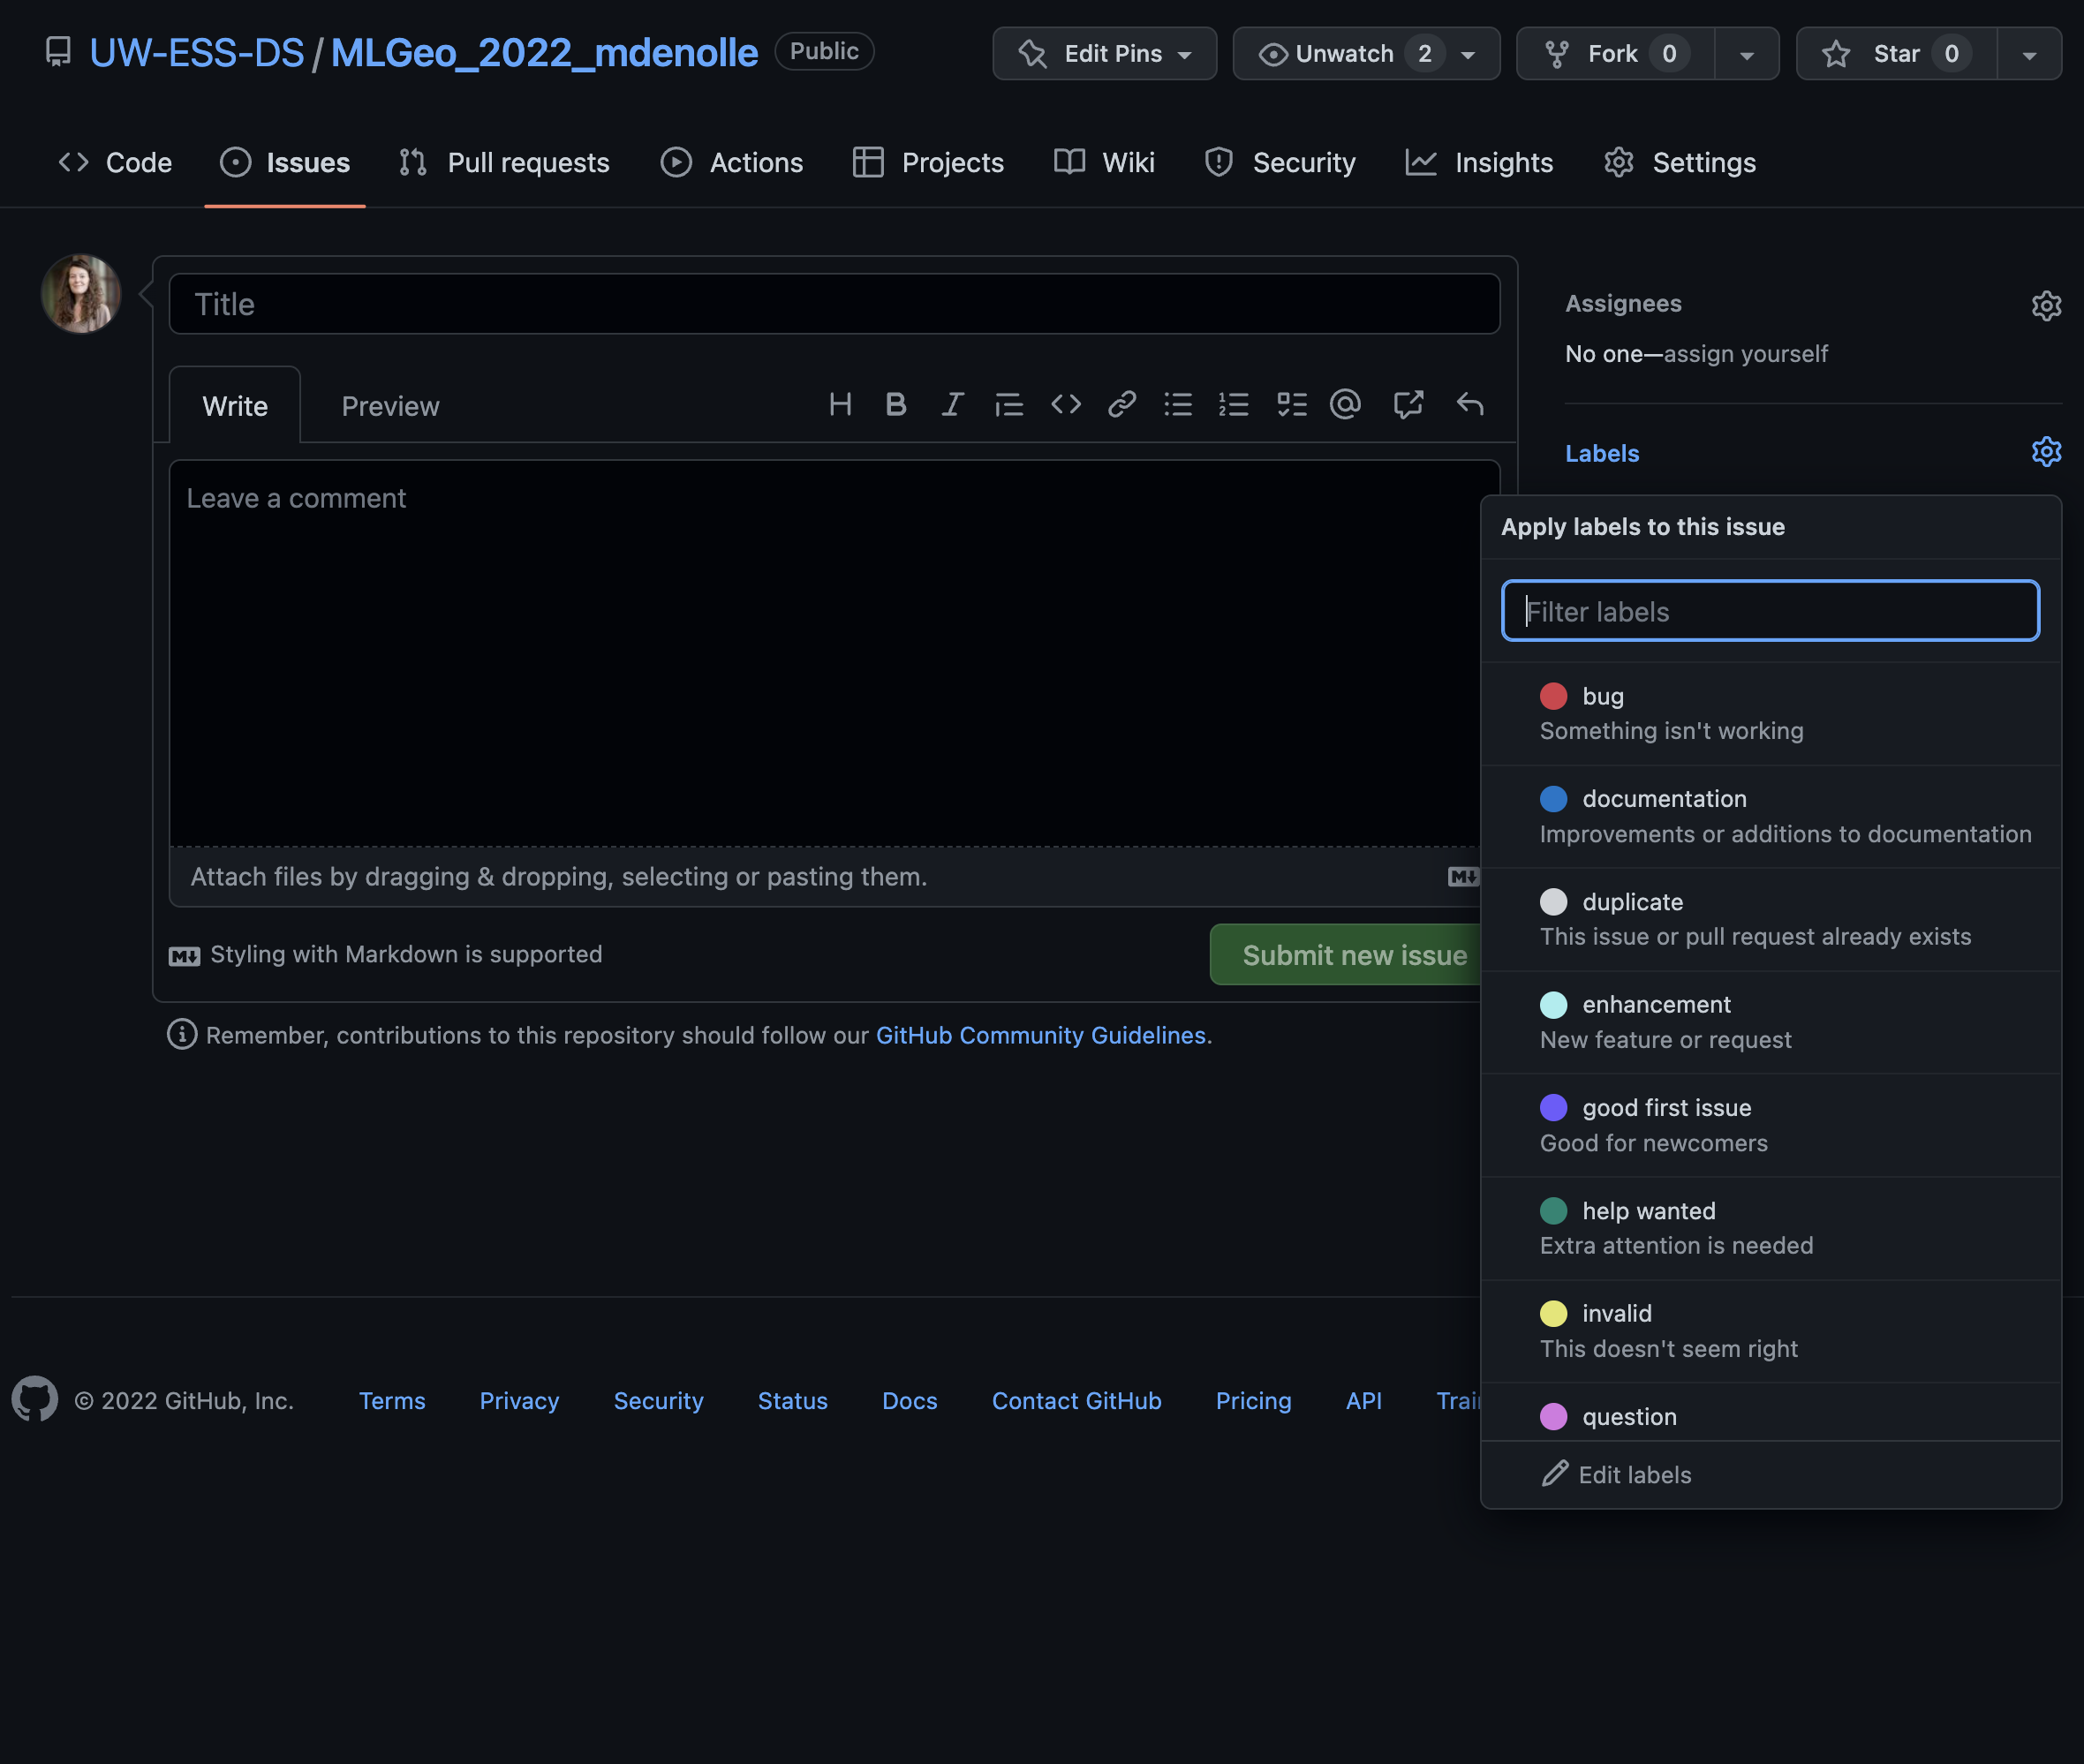
Fig. 5 GitHub Issues: Use template#
Further discussions here
Recommended Repository Structure#
Repository Structure#
your-repo/
├── .github/ # GitHub-specific files (e.g., issue templates, workflows)
│ ├── ISSUE_TEMPLATE/ # for sophisticated community package
│ ├── PULL_REQUEST_TEMPLATE.md  # for sophisticated community package
│ └── workflows/
│ └── ci.yml # Continuous Integration configuration, publish package, build container, test, build github-pages
├── docs/ # Documentation files
│ ├── conf.py # Sphinx configuration file
│ ├── index.rst # Main documentation file
│ └── ...
├── your_package/ # Main package directory
│ ├── init.py # Package initialization
│ ├── module1.py # Example module
│ ├── module2.py # Example module
│ └── ...
├── tests/ # Unit tests
│ ├── init.py
│ ├── test_module1.py # Tests for module1
│ ├── test_module2.py # Tests for module2
│ └── ...
├── .gitignore # Git ignore file
├── environment.yml # Conda environment file
├── requirements.txt # Pip requirements file
├── pyproject.toml # project TOML file for packaging
├── README.md # Project README file
├── LICENSE # License file
└── CONTRIBUTING.md # Contribution guidelines
Note
Github actions allow for automated workflows such as:
Build and Publish GitHub Pages (a tool for HTML)
Build and push Docker Container (a tool for containers)
Testing codes
Set up, test, publish a Pypi package
Explanation of Key Files and Directories#
[
.github/]: Contains GitHub-specific files, such as issue and pull request templates, and GitHub Actions workflows for CI/CD.docs/: Contains documentation files. Using Sphinx for documentation is a common practice.your_package/: The main package directory where your Python modules and packages reside.tests/: Contains unit tests for your package. Using a testing framework likepytestis recommended..gitignore: Specifies files and directories that should be ignored by Git.environment.yml: Defines the conda environment for the project.requirements.txt: Lists the pip dependencies for the project.setup.pyorpyproject.toml: Python packages have standards for packaging projects.setup.pyis the traditional way of defining a python package. Because of new standard, we only detail thepyproject.tomlbelow. You may find other examples ofsetup.pyprojects online.README.md: The main README file that provides an overview of the project.LICENSE: The license file for the project. Licensing is very important, you may find additional explanation for licensing on ChooseALicense. You may need a specific language for a software license and for a data license.CONTRIBUTING.md: Guidelines for contributing to the project. Awesome contributing guides can be used for inspiration!
Example pyproject.toml#
This is a newer standard introduced by PEP 518 and PEP 621. It aims to provide a unified way to specify build system requirements and package metadata. It is part of the effort to modernize Python packaging. Here’s an example pyproject.toml file for packaging your project:
[build-system]
requires = ["setuptools>=42", "wheel"]
build-backend = "setuptools.build_meta"

[project]
name = "your_package"
version = "0.1.0"
description = "A brief description of your project"
readme = "README.md"
requires-python = ">=3.6"
license = {text = "MIT"}
authors = [
    {name = "Your Name", email = "your.email@example.com"}
]
dependencies = [
    "numpy",
    "pandas",
]

[project.urls]
Homepage = "https://github.com/yourusername/your-repo"

[tool.setuptools]
packages = ["your_package"]

[tool.setuptools.entry-points]
console_scripts = [
    "your_command = your_package.module:function"
]
By following this structure and including these key files, you’ll ensure that your Python project is well-organized, easy to navigate, and adheres to best practices for software development. However, GitHub itself does not directly use the pyproject.toml file. Instead, you can set up GitHub Actions to automate tasks such as testing, building, and publishing your package.
Publish your software#
If the software will be used for future research and would be cited by the community, publish your software on Zenodo. GitHub provides guidelines here.
Note
Note for MLGeo 2022 cohort
The course repository is here. Clone it to your jupyterlab environment:
    git clone "https://github.com/UW-ESS-DS/MLGeo-Autumn22"
    cd MLGeo-Autmn22
    git status
To force-reset the repository from the main branch git reset –hard origin/main git pull
Copy the homeworks into your own repository (MLGEO2022_UWNETID). You can play with the tutorials in the MLGeo-Autumn22, but if there is a hard reset it will overwrite your notebook.
Use your own repository to keep your own work.
Push your repository to the main branch after your session so that the instructor can see the changes.
Handling .gitignore to avoid having large files pushed to remote server.
Additional Resources#
The Turing Way ha excellent resources for version control.